A quasi-review of the ASUS AC1900 RT-AC68U router and Bell's ZTE MF275R Turbo Hub (LTE). Other carriers also offer this same device.
As I mentioned in a previous post, getting satisfactory Internet access in the Canadian country-side can be a challenge especially if you have specific needs and don't want to spend a huge fortune (just a small fortune, perhaps). [People living in medium to large-sized towns or cities in Canada generally have access to faster, cheaper, Internet.]
On the one hand there's DSL which is relatively cheap, plans are readily available with no caps, static IPs are available, but the speeds are slow. On the other hand LTE is (in my specific case) >8x faster, but comes with caps, doesn't allow static IPs, and is more expensive.
How to decide between the two? Get both!
Having decided to get both, the next job is to decide how to manage your devices. A simple solution is to run two access points and make each of your devices log into one access point or the other. The ZTE is both an LTE modem and a dual-band WiFi access point all rolled into one device. A regular DSL setup would involve the phone line going to a DSL modem, then out from the modem to a router (which serves as an access point). But if you want the possibility of sharing both Internet connections between all your devices dynamically, a dual-WAN approach is better.
The devices you have in your home which connect to your router via WiFi are described as being on the LAN side of your router. The pathways which lead from your router to the Internet are described as being on the WAN
side of your router. In the vast majority of cases there are usually
many LAN devices and only one WAN connection. In my case I have two ways
to get from my router to the Internet; this is described as a dual-WAN
setup. Most routers expect the "usual" setup and therefore only provide
one WAN connection. In order to run a dual-WAN configuration you have
to own a router that specifically supports this topology. I own an ASUS
AC1900 RT-AC68U router which is one of the few that support dual-WAN and is the one with which I am most familiar.
Other routers support dual-WAN too, you'll need to check the specs of
other routers to verify whether or not they have this feature.
Let's say you do several Internet things with one device: you perform some large downloads from specific sites, and you also want to play some online games. For the downloads you'll want to use the DSL (which, although slower, will not incur large data costs since there's no cap). For gaming you'll want to use LTE. If both Internet connections are on separate routers, you'll need to switch which access point your device uses when performing each of these tasks. Plus you won't be able to perform both tasks at the same time; you'll need to do one task while connected to one access point, then switch to the other access point in order to perform the other task.
Another consideration is reliability. Although both technologies have pretty good uptimes, there will be times when one or the other might be down (especially DSL, I'm not saying DSL goes down every week or even every month, but it does go down and when it does it's very annoying). When one of your Internet connections goes down, you'll need to switch your devices so that they are all on the working access point. Not all devices are smart enough to switch automatically. The flip side of the same argument is: if you use a dual-WAN setup, you only ever have to program one access point (SSID) and password into all your devices and they'll all be able to access the Internet through either Internet connection (WAN interface) regardless of which service is up or down.
In my specific case, I'm using the ZTE MF275R Turbo Hub which I obtained through Bell Canada. If you read through this device's specs you'll find that it only allows 20 devices to be connected to it at a time. This doesn't sound too bad, but the device actually only allows up to 10 devices to be connected at any one time to each band. Since the device supports both 2.4GHz and 5GHz bands, it smudges the truth a little and claims up to 20 devices. So if you have more than 10 older WiFi devices, they can't all connect at the same time (since they'll all be using the 2.4GHz band and probably don't have support for the 5GHz band). My point being, another good reason to consider plugging your Turbo Hub into your router is that most routers don't have this artificial limitation, so you could connect more than 10 devices on any one band and route them all through your LTE Internet connection.
In other words, there are a number of good reasons to connect both Internet sources through the same router to feed your set of devices.
When the AC68U was introduced it did not support dual-WAN. But since its introduction, ASUS has been producing firmware updates and somewhere along the way it added dual-WAN functionality to this device. The last time I checked, however, the "latest" manual still did not reference this new functionality, so even if you download and read through their manual you might not believe this device supports this feature. There is a chance, however, that you might buy a "new" AC68U router to find it is loaded with old firmware. Therefore you can't do dual-WAN "out of the box". In this case you'll need to update the firmware yourself. In any case it's nice to see a manufacturer's stock firmware actually adding to the value of a device over time (instead of a rising trend among manufacturers to use firmware updates to take away features from the consumer!).
As part of its dual-WAN configuration, the AC68U allows the user to define a set of rules (up to 32) whereby it can be specified which LAN device should use which of the WAN interfaces when connecting to which machines on the Internet. It's a great addition, but not perfect. The rules can only be defined in terms of source and destination numerical IP addresses. First of all, it means you have to configure the AC68U's DHCP server to give static IPs to your devices (not a big deal). Secondly, it only works if the machines to which you are connecting (on the Internet) have static IPs themselves (this is getting harder). Alternatively you can leave the destination IP blank, in which case the AC68U will fill in the destination with "all" when you add the rule. In this way you can specify that a given device (say, a Roku) will always only use one specific WAN interface (e.g. the DSL) for all Internet traffic. For my purposes, I can live with these restructions, but I could certainly see how some rules would be better described by source or destination port number/protocol, or DNS name.
1 Oct 2016
29 Sept 2016
Internet in the Canadian Near-City
I love living in the country. But one of the few downsides is Internet connectivity: fewer choices, and poor quality for what few choices exist.
I don't have Fibre To The Home (FTTH) and never will. I'd be happy with Fibre To The Neighbourhood or Distribution Point, but that's probably never going to happen either. I don't even have cable as a choice. My only choices are: satellite, aDSL, and LTE/cell; and they're not great choices.
Satellites are a shared commodity and are over-provisioned to the point of uselessness. I had someone come and give me satellite because of the promised 10Mbps. It was free for the first month; after about 20 days I called and asked them to remove it. It wasn't even worth finishing off the full free first month! Maybe at around 3am in the morning you might get something approaching 10Mbps. That'll last until about 6am. By 8am you're lucky to be getting 1-2Mbps, and from 10am until 3am the next morning you'd do better with a 2400 baud modem and a regular phone line!
With satellite the usage caps are pretty low, the costs are high (considering the low caps), and the performance is "good" if you only use the Internet through the night and don't need it during the day. Oh, and there's no option of simply paying to increase your cap; once you hit your cap, they throttle you down to speeds from the Internet pliocene age until your next billing cycle!
For the last 2 years (since I moved to my current address) I've been muddling along with aDSL. At best I get, maybe, 2Mbps (if I'm lucky) down, and about 600Kbps up. Unlike satellite (or cable, if that were an option) it's not shared, so it's a pretty constant 1.5-2Mbps throughout the entire day. But here's the funny thing: every once in a while the performance plummets and I'm forced to contact my ISP for a remedy. DSL lines can be set to one of a couple "profiles": there's a "go as fast as you can and ignore dropped packets" profile, a "minimize packet drops by going slower" profile, and a "make them pine for the days of dialup" profile. The annoying thing is, the carrier's network equipment is able to switch the profile without any human intervention! So every once in a while the network analyzes my line, decides my dropped packet rate is too high, and switches me to a slower profile. Once I notice, I'm forced to log a performance ticket with my ISP, whose response is to log a ticket with the carrier, who (eventually) changes me back to the hi-speed performance profile and everything is fine again (if you call 2Mbps "fine"). But, of course, that doesn't happen too quickly, so I usually have to go a couple days with very slow lines before I'm boosted back up. That happens roughly 5 times a year.
With DSL it's easy and relatively cheap to get unlimited (or virtually unlimited) download caps, the cost is low-ish, but the performance isn't great. However, the speed is consistently not great, so you get used to it (until their equipment sets you to a lower profile). When I say the cost is low I'm not implying it's cheap by any stretch of the imagination. I'm speaking relative to the other Canadian choices; certainly not relative to what people in other countries pay.
Most providers offer different DSL packages. For a lot of money a person can get really fast DSL, but if someone wanted to save a bit of cash they can opt for slower DSL speeds. The slowest package I can find is a 5/0.8Mbps package for $53 with a 50GB cap. Nobody offers a 2Mbps package, so even if I took this 5Mbps package, I would already be paying for >50% bandwidth I'm never going to realize because the equipment on my street simply can't go that fast. As it turns out I needed a static IP and I wanted a plan with no cap so the cheapest plan I could find to fit that criteria is a 10Mbps plan. So I'm paying for a 10Mbps connection, but by living in the country I'm not getting everything for which I'm paying.
Even though DSL isn't that great an option, ironically I'm "lucky" to have it. I'm the last person on my street to which the DSL lines extend. My neighbour, a couple houses down, doesn't have the option of DSL since these lines end at the junction box outside my home. My home is about 2.5 km from the neighbourhood junction, and that junction is about 4-5 km from the CO. So it's actually amazing that I even get DSL at all!
My final option is LTE (Internet over modern cell towers). Internet via cell towers has been around for many years (decades?) but it's an option I've never taken seriously due to the ridiculously low caps, the (traditionally) low speeds, and how we're gouged on cell data prices here in Canada. A recent conversation with a fellow country-living friend, however, had me reconsider. We've finally gotten to the point where LTE is, at least, worth considering. LTE offers much better speed than had been available via cell towers, so the data rate is now good. Again, everything's relative. For $60/month I can get roughly 16Mbps and a 5GB cap. How is this worth considering? If I put in a second DSL line and bonded them, I'd be paying over $140/month and my speed would only be roughly 4-5Mbps (but I'd have no cap). Spending $110/month on an LTE plan would give me up to 50GB (cap) at 16Mbps. Before LTE, doing Internet over cell towers would give you speeds in the low Mbps or high Kbps, have caps in the 100's of MBs, and I won't even bother mentioning the price.
Another major consideration is reliability, and it's not something you should ignore. The reliability of satellite is abysmal; the laws of physics simply dictate that weather is going to interfere. DSL is better since it's not as dependent on weather, but as a long-time DSL user I can attest to the fact that downtime will happen. Looking back through the tickets I've opened with my ISP over the years (I've been using DSL since the late 90's) I'd say that roughly 8-10 times a year you'll find yourself without Internet for at least a day if not the entire weekend. I'm new to LTE so I can't give any feedback on its reliability. However, in theory, cell towers tend to have excellent up-time, so, in theory, LTE should have fantastic up-times as well.
I like to think of myself as someone who lives in the country but I refer to myself as living near-city since I have the advantage of being close enough to a major city such that there are cell towers in my area and that they've been upgraded to LTE. If I lived in even a largish town there might exist the possibility of fibre, or at the very least I could get fast DSL or cable (and at least get everything for which I was paying). But since I do live close to cell towers with LTE I have to categorize myself as a near-city country-living Canadian, as distinct from other country-living Canadians who don't live within cell-tower range, for whom the only options would be dial-up or satellite.
What is my solution? Currently I've kept my DSL line for any large downloads, and Netflix (it's more than adequate for standard definition streaming using a Roku 3). But I also have an LTE device for those situations where speed is essential but the download amount isn't going to be too high.
19 Aug 2016
Gerrit User Management for a Small Installation
Setting up Jenkins is a simple matter of downloading the latest .war file and java -jar'ing it. It comes with all the basics of what you need, including its own web server. So there's no need to fiddle with things like databases or web servers... if you don't want to. Most people at a given organization don't need accounts on their Jenkins instance. In most cases, only a couple people who are able to create and manage its various jobs need to log on. Most other people just want to see the status, maybe download the latest successful compile, or look at the logs of a recent failure. These are things most anonymous users can do.
Bugzilla isn't quite as easy to setup; you need to assemble the pieces mostly yourself. It also doesn't have its own built-in web server (which is, really, its primary function, no?) so you have to integrate it with Apache or Nginx. For basic installations the defaults are fine, and it comes with functional user management and a simple database if you don't need "production" quality. Most people contributing to a project should have a Bugzilla account, and Bugzilla has good enough user management "out of the box", especially for a small installation.
Gerrit requires everyone who interacts with it to contribute to a repository to have an account. You wouldn't want any anonymous user to be able to make changes to your patch flow? Plus you do want to track everyone who does make a change.
Sadly, Gerrit doesn't include any sort of built-in user management. Not even a dumb, "don't use this for production environments", user-management system (like Jenkins or Bugzilla). Gerrit assumes, and requires you to use, an external identity management system (such as having your users use their google or facebook credentials via OpenID; a company-wide ldap installation; or the user-management features from a web server).
If you're part of a large organization, which has a dedicated and capable IT team, these issues aren't of any concern to you. All you need to do is to decide that you want to use Gerrit. Setting it up and managing it is someone else's problem. But small companies can benefit from distributed code review too, and if nothing else, at its core Gerrit is a solid source code repository server.
With a small team there usually isn't a dedicated person who is responsible for managing servers. You have developers, you have sales people, you have a CEO, you have managers (there are always managers), and you have someone doing the financial stuff. But there's rarely a dedicated IT person who is able to setup a Linux machine, configure, and manage various services (Bugzilla, Jenkins, Gerrit, etc). That job ends up falling to some developer who would rather be writing code than configuring servers.
The reasons why Gerrit doesn't do user management are obviously religious. Gerrit does include its own "don't use this for production installations" database (h2) and provides all the ODBC connectors you need to connect it to any real database you can imagine. So if it's already doing database stuff, why not just add a user table? But it's even worse than that. Pure Gerrit doesn't even allow you to specify permissions at the user level, only at the group level. This means you have to create a group for every meaningful permission you want to assign. At a small-ish installation this means that you end up with lots of groups all of which only contain one person.
Fortunately there is an easy-enough-to-install plugin which allows you to create a group for every user, so creating a fine-grained permission scheme for a small team with a group of projects is relatively easy enough, but is awkward that you still need to manage users that are users, and users that are groups.
Unfortunately there isn't an easy-enough-to-install add-on for user management. But, if you fetch the Gerrit sources, you will find a perl script called fake_ldap.pl in its contrib folder. fake_ldap.pl makes it easy to generate a file which your Gerrit installation can query to get the basic information regarding your allowed users. It does require you to manage this file by hand yourself outside of your Gerrit system. But, in my experience, provides the easiest way to manage the users of a small Gerrit installation.
26 Jun 2016
How To Setup JTAG with Galileo (the modern version)
A recent blog post from Olimex pointed to a document [1] showing how to debug the Intel Galileo board using a JTAG. The nice thing about the document is that it assumed the user would be building their own image using Bitbake/OpenEmbedded. The unfortunate part is that the Galileo BSP downloads from Intel are so ancient they have next-to-no chance of working on a recent, modern distro. Their instructions, however, do point this out (i.e. ...this procedure was performed on <some old version of> Ubuntu...), leaving the user little choice but to start by preparing a VM in which to perform the build!
Back when the Galileo board was released, Intel did a great job of supporting it by creating various layers to be used with OpenEmbedded: meta-clanton, meta-galileo, meta-intel-iot-devkit, meta-intel-iot-middleware, meta-intel-quark-fast, meta-intel-quark. But, as you can see, that support was a bit "scattered". On top of that, it doesn't look like meta-clanton was ever placed somewhere public; the only way to get it (and to build for the Galileo) was to download a massive BSP from Intel which included it. Over time this massive download was replaced by a smaller download, which then required you to run a script which would pull in all the sub-components as a separate step (which performed the massive download). Additionally, a fixup script needed to be run in order to clean up some of the build area before you could start your build. Attempting any of this procedure on a modern Linux development host is very likely to fail.
Fast-forward to today (June 26, 2016) and all that's needed to create an image for the Galileo are a distro layer, the basic OE meta layer, and meta-intel. Or, if you're using poky as your distro, you'll get the meta data as part of it.
Building An Image for the Galileo
$ mkdir /some/place$ cd /some/place
$ mkdir layers
$ pushd layers
$ git clone git://git.yoctoproject.org/poky meta-poky
$ git clone git://git.yoctoproject.org/meta-intel
$ popd
$ . layers/meta-poky/oe-init-build-env galileo
Now, edit conf/local.conf so that
MACHINE ?= "intel-quark"
EXTRA_IMAGE_FEATURES ?= "debug-tweaks tools-debug tools-profile"
And edit conf/bblayers.conf to replace the part that says "meta-poky/meta-yocto-bsp" with "meta-intel".
Now run:
$ bitbake core-image-minimal
When bitbake starts it prints some build configuration information. For my build I saw:
Build Configuration:
BB_VERSION = "1.31.0"
BUILD_SYS = "x86_64-linux"
NATIVELSBSTRING = "SUSELINUX-42.1"
TARGET_SYS = "i586-poky-linux"
MACHINE = "intel-quark"
DISTRO = "poky"
DISTRO_VERSION = "2.1+snapshot-20160622"
TUNE_FEATURES = "m32 i586-nlp"
TARGET_FPU = ""
meta
meta-poky = "master:6f0c5537e02c59e1c8f3b08f598dc049ff8ee098"
meta-intel = "master:1b98ae6d7e10390c9ecb383432593644a524f9c8"
If your build fails, one thing you could try is to go to each of the layers and checkout the commits specified in the above information; then restart the build.
At the end of a successful build, continue with the following to create an SDcard image:
$ bitbake parted-native
$ wic create mkgalileodisk -e core-image-minimal
Look through the wic output, it will tell you where it has placed its artifact. Use dd to create your SDcard with the wic artifact:
# dd if=/var/tmp/wic/build/mkgalileodisk-<datetime>-mmcblk0.direct of=/dev/sdX bs=1M
Cross-GDB
Eventually you're going to use GDB, via openOCD, to debug your target. In order for this to work (in addition to openOCD) you're going to need two things:- a gdbserver "stub" running on your target
- a cross-GDB running on your development machine
Above, as part of your first build, I mentioned that you needed to adjust the EXTRA_IMAGE_FEATURES variable of your conf/local.conf file. One of the things that change does is to include the gdbserver stub in your target image.
In order to build a native cross-GDB for your development host you'll need to generate an SDK for your image:
$ bitbake core-image-minimal -c populate_sdk
Once built, you then need to install the SDK. To do so, simply run the resulting SDK script which you'll find in ${TMPDIR}/deploy/sdk. The install script will ask you where you want to install the SDK; type in a path and press Enter, or simply press Enter to accept the default.
Once installed, source the SDK environment file:
$ . <SDK_INSTALL_LOCATION>/environment-setup-i586-nlp-32-poky-linux
OpenOCD
My recommendation is to get, build, and install the latest OpenOCD from sources:$ mkdir <SOMEPLACE_TO_BUILD_OPENOCD>
$ cd <SOMEPLACE_TO_BUILD_OPENOCD>
$ git clone git://git.code.sf.net/p/openocd/code openocd
$ cd openocd
$ ./bootstrap
$ ./configure
At the end of ./configure'ing, the script will print out a list of all the dongles for which it can include support. Reasons why it can't include support for a particular dongle may include the lack of additional required libraries. If a particular dongle is marked as un-buildable and you want to build support for that dongle, you'll need to figure out the reason(s) why it can't presently be built (i.e. figure out which library it needs) and fix the deficiency (i.e. use your host distribution's package manager to install that library's -dev/-devel package). The ./configure script is pretty good at telling you which library/libraries are missing.
Once the configuration is done:
$ make -j
$ sudo make install
Connecting to the Galileo via JTAG and GDB
Two terminals are required for this part. In one terminal you'll run OpenOCD and in the other you run the cross-GDB (or telnet).To run OpenOCD you'll need to tell it to which board you're connecting, and which dongle you're using. Obviously the board part will remain the same, but the dongle part for you might be different depending on whether or not you're using the same dongle(s) as me. Also, the order in which this information is given to OpenOCD is important. Apparently you need to specify the dongle first, then the board.
In the following example I'm using the Segger j-link EDU:
# openocd -f interface/jlink.cfg -f board/quark_x10xx_board.cfg
Open On-Chip Debugger 0.10.0-dev-00322-g406f4d1 (2016-06-22-09:29)
Licensed under GNU GPL v2
For bug reports, read
http://openocd.org/doc/doxygen/bugs.html
Info : auto-selecting first available session transport "jtag". To override use 'transport select <transport>'.
adapter speed: 4000 kHz
trst_only separate trst_push_pull
Info : No device selected, using first device.
Info : J-Link V9 compiled Apr 15 2014 19:08:28
Info : Hardware version: 9.00
Info : VTarget = 3.354 V
Info : clock speed 4000 kHz
Info : JTAG tap: quark_x10xx.cltap tap/device found: 0x0e681013 (mfg: 0x009 (Intel), part: 0xe681, ver: 0x0)
enabling core tap
Info : JTAG tap: quark_x10xx.cpu enabled

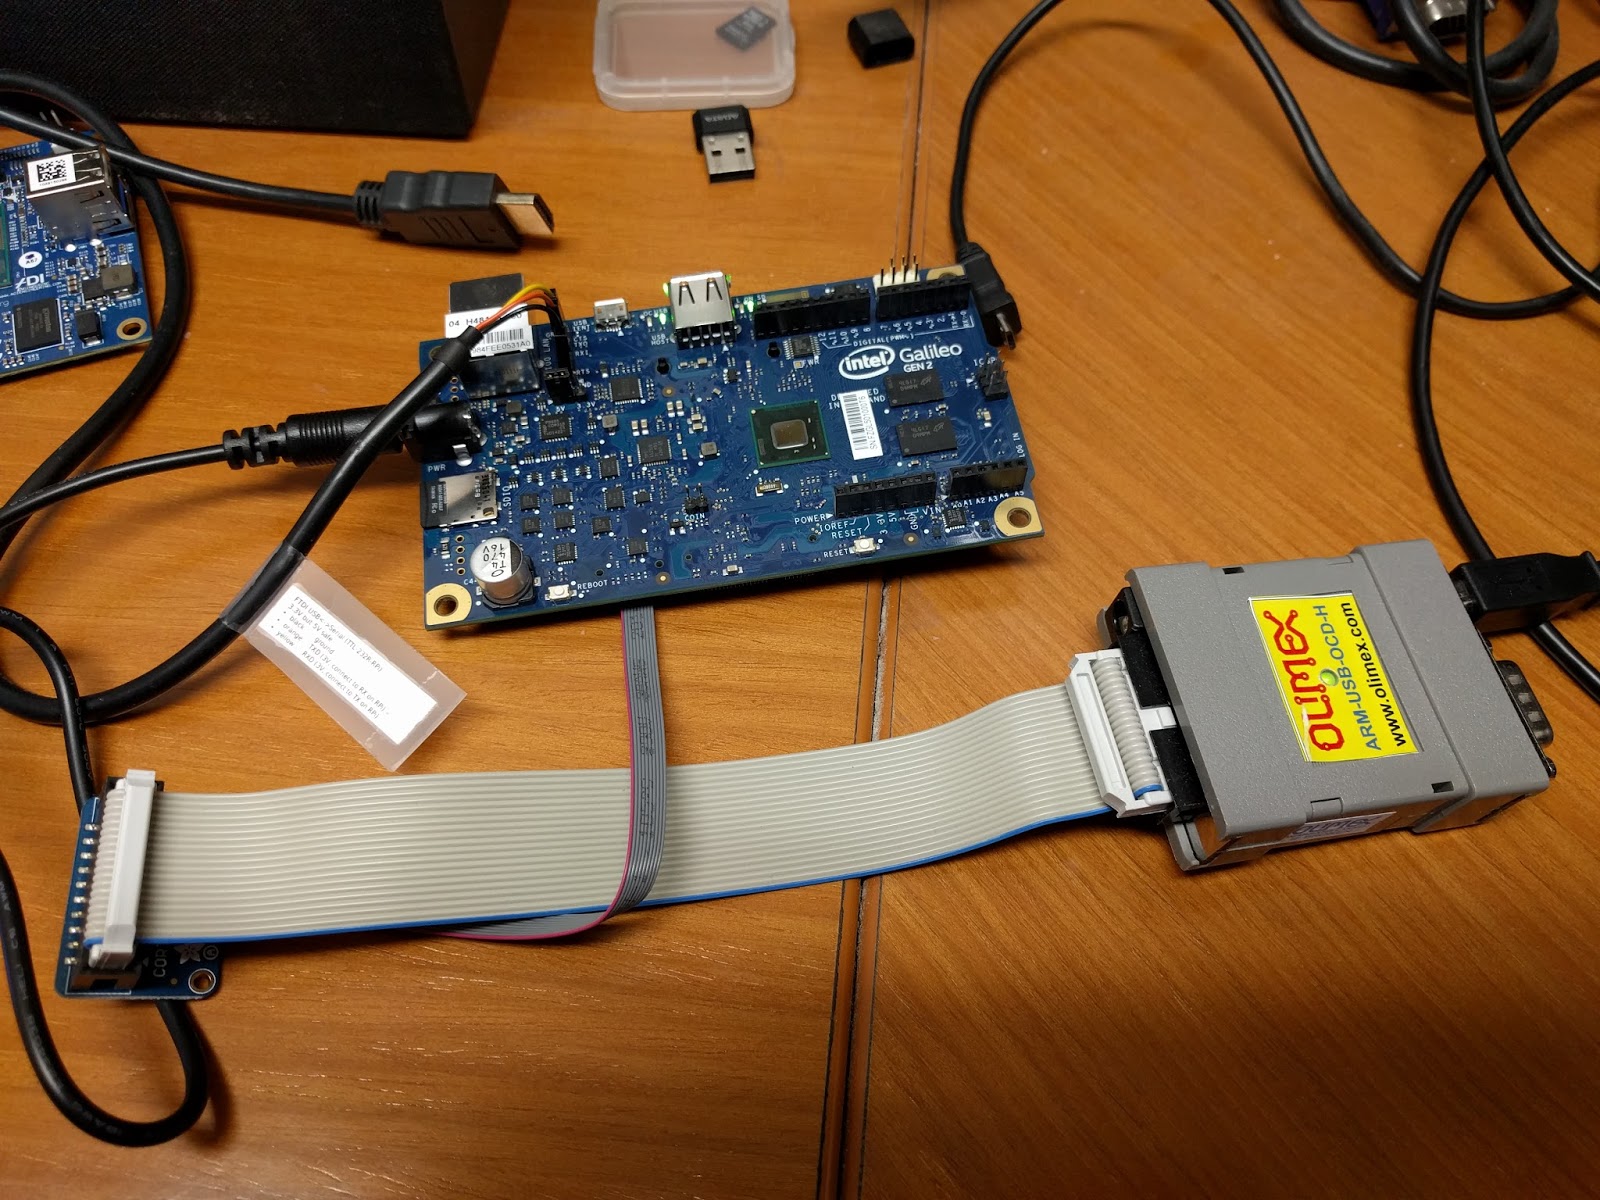
In this example I'm using the ARM-USB-OCD-H from Olimex:
# openocd -f interface/ftdi/olimex-arm-usb-ocd-h.cfg -f board/quark_x10xx_board.cfg
Open On-Chip Debugger 0.10.0-dev-00322-g406f4d1 (2016-06-22-09:29)
Licensed under GNU GPL v2
For bug reports, read
http://openocd.org/doc/doxygen/bugs.html
Info : auto-selecting first available session transport "jtag". To override use 'transport select <transport>'.
adapter speed: 4000 kHz
trst_only separate trst_push_pull
Info : clock speed 4000 kHz
Info : JTAG tap: quark_x10xx.cltap tap/device found: 0x0e681013 (mfg: 0x009 (Intel), part: 0xe681, ver: 0x0)
enabling core tap
Info : JTAG tap: quark_x10xx.cpu enabled
Now, to communicate with and control the board via OpenOCD you need to open a second terminal. If you want to simply send commands to OpenOCD (such as to check or flash the board) you can simply use telnet:
$ telnet localhost 4444
Trying ::1...
telnet: connect to address ::1: Connection refused
Trying 127.0.0.1...
Connected to localhost.
Escape character is '^]'.
Open On-Chip Debugger
>
If you want to debug the target via GDB then you need to startup the cross-GDB and connect it to OpenOCD from within GDB itself (note: the cross-GDB should be already on your $PATH, it comes from the SDK we built and installed earlier; if it's not on your PATH you may have forgotten to source the SDK's environment file, see above):
$ i586-poky-linux-gdb
Python Exception <class 'ImportError'> No module named 'operator':
i586-poky-linux-gdb: warning:
Could not load the Python gdb module from `sysroots/x86_64-pokysdk-linux/usr/share/gdb/python'.
Limited Python support is available from the _gdb module.
Suggest passing --data-directory=/path/to/gdb/data-directory.
GNU gdb (GDB) 7.11.0.20160511-git
Copyright (C) 2016 Free Software Foundation, Inc.
License GPLv3+: GNU GPL version 3 or later <http://gnu.org/licenses/gpl.html>
This is free software: you are free to change and redistribute it.
There is NO WARRANTY, to the extent permitted by law. Type "show copying"
and "show warranty" for details.
This GDB was configured as "--host=x86_64-pokysdk-linux --target=i586-poky-linux".
Type "show configuration" for configuration details.
For bug reporting instructions, please see:
<http://www.gnu.org/software/gdb/bugs/>.
Find the GDB manual and other documentation resources online at:
<http://www.gnu.org/software/gdb/documentation/>.
For help, type "help".
Type "apropos word" to search for commands related to "word".
(gdb) target remote localhost:3333
Remote debugging using localhost:3333
Python Exception <class 'NameError'> Installation error: gdb.execute_unwinders function is missing:
0x00000000 in ?? ()
(gdb)
[1] Source Level Debug using OpenOCD/GDB/Eclipse on Intel Quark SoC X1000, sourcedebugusingopenocd_quark_appnote_330015_003-2.pdf
16 Jun 2016
Overriding Repositories In repo Manifests With Personal Github Forks
Here is the situation: you're working on a development project that uses repo[1] but you'd like to replace one or more of those repositories with ones of your own which you have forked on github and would like to be able to push your changes back into your github fork.
The good news is repo already has a mechanism for this. The only complicated part is getting the github URL correct such that you can push your changes via ssh.
In the project's manifest will be a repository you want to override; it has a name. In your project go into the .repo directory and create a directory called local_manifests. In .repo/local_manifests create a file using any filename, just make sure it ends with .xml ; for some, unknown reason, it is traditional to name this file roomservice.xml . Within .repo/local_manifests/roomservice.xml you can remove and add repositories to your heart's content.
For example, the project I'm working on has a manifest that looks like:
Notice that the names that are used in the <remove-project.../> lines are the same names as the lines from the original manifest that I want to replace.
Did you notice that I used "origin" as the remote name? When repo clones this repository, it will use this name as git's remote name, and since git assumes the primary remote's name is "origin", this configuration simply makes life a touch easier. You're free to use whatever remote name you want, but in this case you'll just need to run add your remote's name the first time you "git push..." .
[1]
"What is repo?" repo is a tool created by (and very popular with) Android developers to manage building software comprised of sets of git repositories. Many software projects fit into one git repository, but sometimes a project likes to keep separate git repositories for different parts of the project. This, then, creates a burden on the developer to make sure the correct repositories, are cloned to the right places, and checked out at the right commits. repo is a tool that lists which repositories are used, where to place them relative to one starting directory, and checks out a specific revision/commit. Therefore it removes the extra burdens caused by multi-repository projects. repo also has functionality to allow your project to integrate with gerrit (a code review system), but that's another topic. For more information on repo try:
The good news is repo already has a mechanism for this. The only complicated part is getting the github URL correct such that you can push your changes via ssh.
In the project's manifest will be a repository you want to override; it has a name. In your project go into the .repo directory and create a directory called local_manifests. In .repo/local_manifests create a file using any filename, just make sure it ends with .xml ; for some, unknown reason, it is traditional to name this file roomservice.xml . Within .repo/local_manifests/roomservice.xml you can remove and add repositories to your heart's content.
For example, the project I'm working on has a manifest that looks like:
1 <?xml version="1.0" encoding="UTF-8"?>I want to replace the repositories described at lines 22 and 26 with my own repositories. I start off by going to github, finding those repositories, and clicking on the Fork button in the web interface for both. Then I create my .repo/local_manifests/roomservice.xml file with the following contents:
2 <manifest>
3 <default revision="master" sync-j="4"/>
4
5 <remote fetch="http://github.com/" name="github"/>
6 <remote fetch="http://github.com/insane-adding-machines/" name="frosted"/>
7 <remote fetch="git://crosstool-ng.org/" name="crosstool-ng"/>
8
9 <!-- utilities -->
10 <project remote="github" name="texane/stlink" path="toolchain/stlink"/>
11
12 <!-- toolchain -->
13 <project remote="crosstool-ng" name="crosstool-ng" path="toolchain/crosstool-ng"/>
14 <project remote="frosted" name="elf2flt" path="toolchain/elf2flt"/>
15 <project remote="frosted" name="newlib" path="toolchain/newlib" revision="frosted">
16 <linkfile src="../../.repo/manifests/ctng-custom-elf2flt.patch" dest="toolchain/ctng-custom-elf2flt.patch"/>
17 <linkfile src="../../.repo/manifests/arm-frosted-eabi.config.in" dest="toolchain/arm-frosted-eabi.config.in"/>
18 <linkfile src="../../.repo/manifests/buildtoolchain.sh" dest="buildtoolchain.sh"/>
19 </project>
20
21 <!-- kernel + userspace -->
22 <project remote="frosted" name="frosted" path="frosted"/>
23 <project remote="frosted" name="libopencm3.git" path="frosted/kernel/libopencm3"/>
24 <project remote="frosted" name="busybox.git" path="frosted/apps/busybox"/>
25 <project remote="frosted" name="picotcp" path="frosted/kernel/net/picotcp"/>
26 <project remote="frosted" name="frosted-userland.git" path="frosted/frosted-userland"/>
27
28 </manifest>
1 <?xml version="1.0" encoding="UTF-8"?>At this point I simply invoke "repo sync" (you might need to add --force-sync) and you're all set! Those repositories will now be sync'ed from your github copies, you can work in the code of those repositories, make commits, and push them up to github.
2 <manifest>
3 <remote fetch="ssh://git@github.com/twoerner/" name="origin"/>
4 <remove-project name="frosted"/>
5 <remove-project name="frosted-userland.git"/>
6 <project remote="origin" name="frosted.git" path="frosted" revision="contrib/twoerner-master"/>
7 <project remote="origin" name="frosted-userland.git" path="frosted/frosted-userland" revision="contrib/twoerner-master"/>
8 </manifest>
Notice that the names that are used in the <remove-project.../> lines are the same names as the lines from the original manifest that I want to replace.
Did you notice that I used "origin" as the remote name? When repo clones this repository, it will use this name as git's remote name, and since git assumes the primary remote's name is "origin", this configuration simply makes life a touch easier. You're free to use whatever remote name you want, but in this case you'll just need to run add your remote's name the first time you "git push..." .
[1]
"What is repo?" repo is a tool created by (and very popular with) Android developers to manage building software comprised of sets of git repositories. Many software projects fit into one git repository, but sometimes a project likes to keep separate git repositories for different parts of the project. This, then, creates a burden on the developer to make sure the correct repositories, are cloned to the right places, and checked out at the right commits. repo is a tool that lists which repositories are used, where to place them relative to one starting directory, and checks out a specific revision/commit. Therefore it removes the extra burdens caused by multi-repository projects. repo also has functionality to allow your project to integrate with gerrit (a code review system), but that's another topic. For more information on repo try:
Subscribe to:
Posts (Atom)